Classroom · Operations
The Traffic Pattern & ATIS: Flying the Rectangle
Every arrival and departure at a busy runway runs on one shared shape — a rectangle in the sky that keeps airplanes spaced, predictable, and pointed into the wind. This lesson teaches the traffic pattern from the ground up: how to copy the ATIS in a fixed order, the five named legs and why we default to left turns, how high to fly and when to descend, the standard 45° midfield entry at a non-towered field, what to say on the radio, how the tower sequences you, how to pick the runway from the wind, and how to fly a clean go-around when a landing goes wrong — with an original diagram for every idea.
Why a traffic pattern exists
Put a dozen airplanes near one runway with no agreed procedure and you get chaos: converging tracks, no way to predict who turns where, and midair-collision risk. The traffic pattern solves that by making everyone fly the same standardized rectangular path around the landing runway. When every aircraft flies the same shape at the same altitude in the same direction, you always know where to look for traffic, how to fall into sequence behind it, and where the next airplane will be a minute from now. Predictability is the whole point.
The pattern also does two other jobs. It keeps you close enough to the runway that an engine failure on the downwind or base leg still leaves you gliding distance to reach it — the rectangle is deliberately tight, not a lazy loop miles out. And it lines you up to land and take off into the wind, which shortens your ground roll and gives you the slowest possible groundspeed at touchdown. The FAA lays the pattern out in the Aeronautical Information Manual (AIM 4-3-2 and 4-3-3) and the Airplane Flying Handbook; the left-turn default is codified in 14 CFR 91.126. Everything below is that guidance, taught so you can fly it.
Key idea The pattern is a shared, predictable rectangle flown at a fixed altitude, in a fixed direction (left by default), lined up into the wind. Predictability is what keeps everyone separated.
ATIS: copy it fast, in a fixed order
Before you ever touch the pattern at a towered field, you get the ATIS — the Automatic Terminal Information Service. It is a continuous recorded broadcast of the current airport weather and operational information, so that controllers don’t have to read the same conditions to every pilot. It is refreshed roughly once an hour (or immediately when conditions change), and each update gets the next phonetic letter — Alpha, then Bravo, then Charlie, and so on. That letter is the whole point of the “code”: it proves to the controller that you have the current information.
The magic is that ATIS is always spoken in the same order, so you can build a mental checklist and copy it fast on a kneeboard. Listen for these fields, always in this sequence:
Here is that same broadcast written out, then decoded field by field. Notice how much of it is simply the current METAR spoken aloud — visibility, sky, temperature/dewpoint, and altimeter are the identical values you would read in the raw report (the wind is the same measurement too, only referenced to magnetic here rather than the true north used in the raw METAR text):
| Field | What it tells you |
|---|---|
| Info Bravo | Airport name and the phonetic identification letter. “Bravo” is the second issue in sequence — the letter advances one step with every new recording and does not reset each hour; a new letter always means new information. |
| 1853Z | The observation time in Zulu (UTC) — the same time stamp as the METAR. |
| 310 at 9 | Wind from 310° at 9 knots. On the ATIS this is magnetic (matched to runway numbers), unlike the raw METAR which is true. |
| 10 | Prevailing visibility, 10 statute miles. |
| clear below 12,000 | Sky condition and any present weather — here, no significant cloud sensed. |
| 24 / 9 | Temperature and dewpoint in °C. A wide spread means dry air; a small one warns of fog. |
| 30.12 | Altimeter setting, 30.12 inHg — dial it into the Kollsman window. |
| Rwy 31R | The active runway(s) in use for landing and departure — the single most operationally important line for the pattern. |
| advise you have B | Remarks, then the closing instruction to tell the controller you have this information on first contact. |
True vs magnetic The wind in a raw METAR text is degrees true. The wind read to you on the ATIS or by the tower is magnetic, so it lines up with your runway numbers. Same wind, two references — want to see the raw values behind the broadcast? Decode any observation in the METAR decoder.
The five legs of the pattern
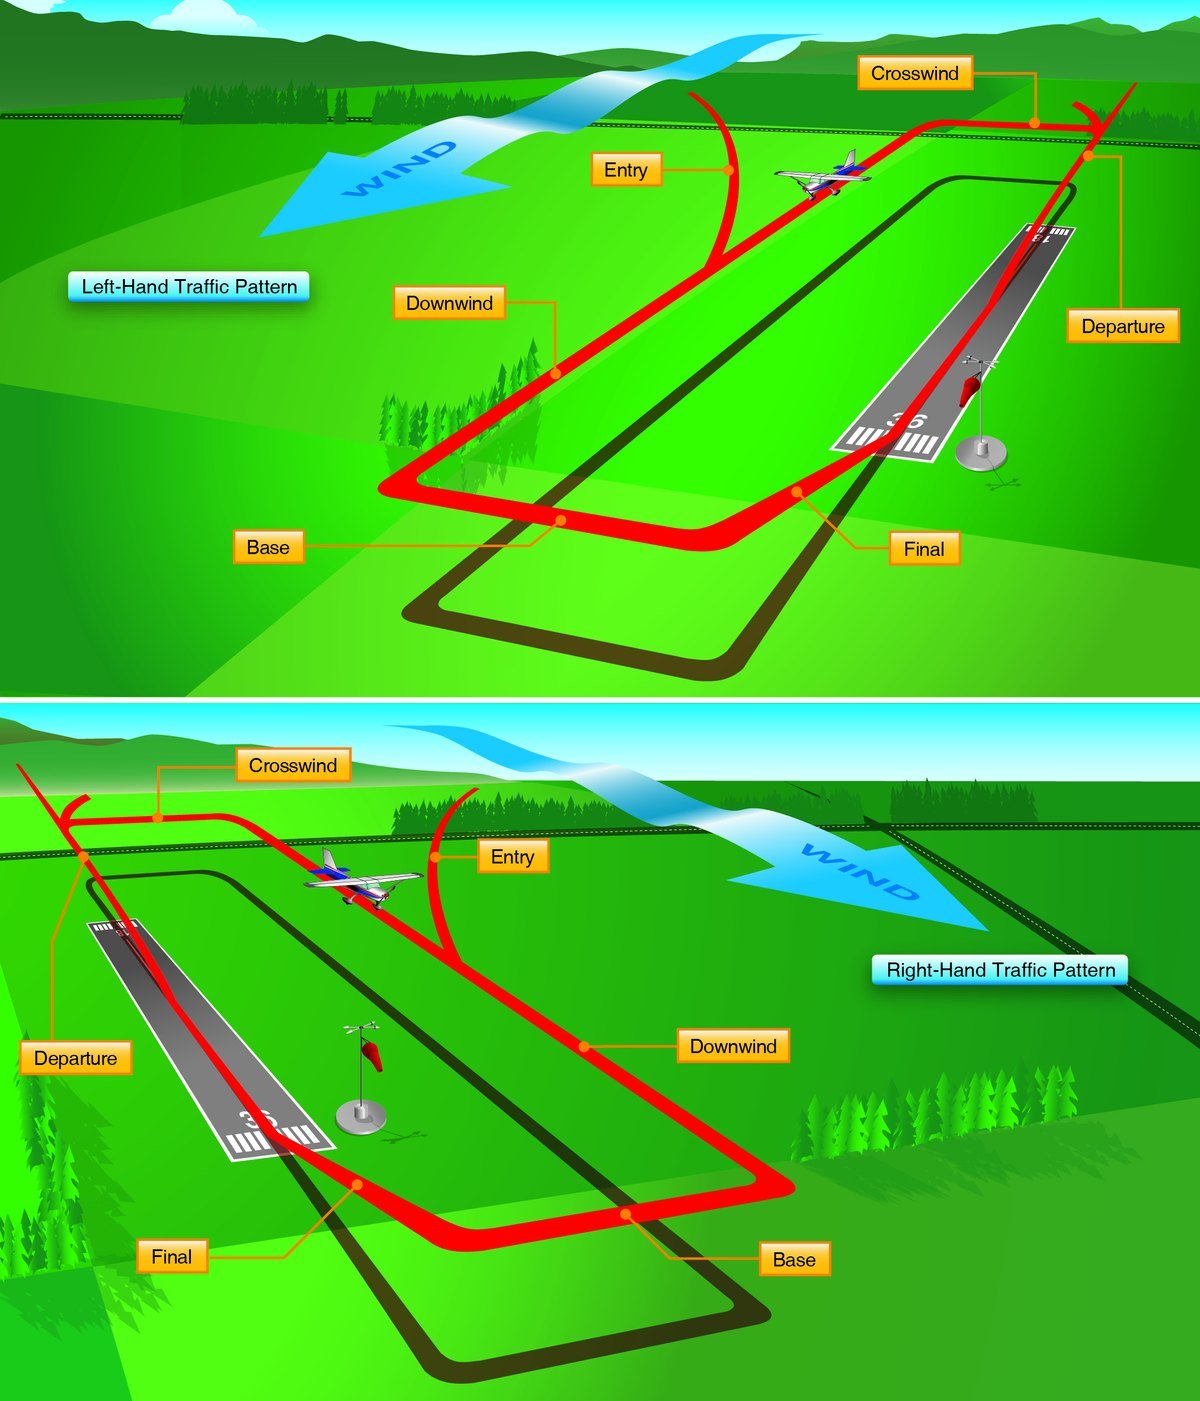
The rectangle is built from five named segments, called legs. Fly them in order and you have flown one lap of the pattern. Here is the whole shape from above, with the runway drawn vertically and the airplane taking off and landing toward the top — into the wind.
1 · Upwind / Departure
The climb straight ahead off the departure end, aligned with the runway. Keep climbing on runway heading until you are ready to turn.
2 · Crosswind
A 90° turn away from the runway, flown after the departure end. You climb here toward pattern altitude.
3 · Downwind
Parallel to the runway, flown in the opposite direction to landing, at pattern altitude. This is where you plan the approach.
4 · Base
A 90° descending turn connecting downwind to final. Configure, slow, and begin the descent in earnest.
5 · Final
Aligned with the runway centerline for landing. Descending, on speed, into the wind — the last leg.
A couple of naming notes save confusion later. The straight climb after takeoff is precisely called the departure leg; many pilots and the AIM also use upwind leg for a path parallel to and in the direction of landing (for example, when you overfly the runway during a go-around). In everyday pattern talk you will hear the initial climb-out called “upwind,” and that is fine — just know the two words point at the same part of the rectangle. Every turn between legs is 90°, and on a standard pattern every one of them is to the left.
Left vs right traffic
By default, a traffic pattern uses left turns — the pilot in the left seat has the runway out the left window through the whole pattern, which makes it easy to judge spacing and keep the airport in sight. This left-hand default is not just custom; it is the regulation. Under 14 CFR 91.126, at an airport without an operating control tower each pilot must make all turns to the left unless the airport displays approved indicators for a right-hand pattern.
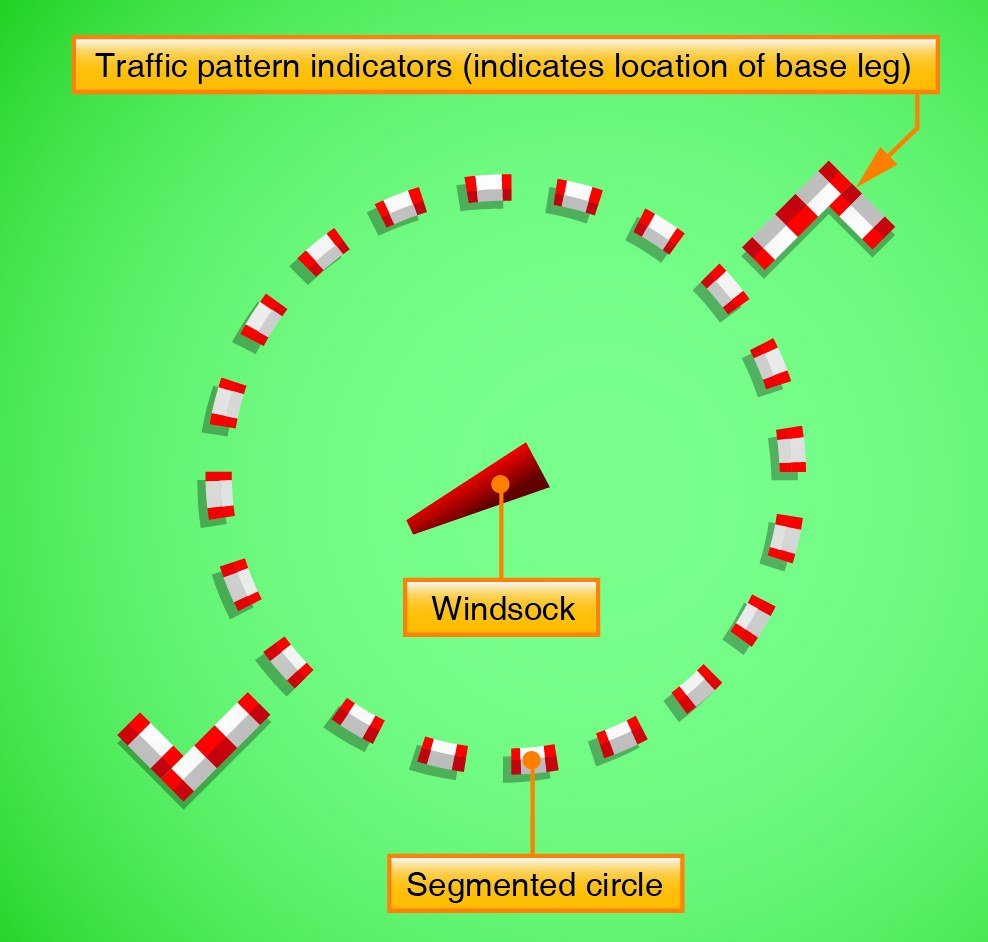
Some runways instead use right traffic, almost always to keep airplanes away from terrain, a town, or a noise-sensitive neighborhood on one side of the field. When a runway uses right traffic it is published as “RP” (Right Pattern) next to that runway in the Chart Supplement and shown on the sectional; on the field itself a segmented circle with L-shaped traffic-pattern indicators shows the pattern direction for each runway. Always check before you arrive — flying the wrong direction points you head-on at everyone doing it right.
Before you go For every runway you might use, know the pattern direction and the traffic-pattern altitude in advance. Both live in the Chart Supplement entry for the airport; the direction is also drawn on the ground in the segmented circle.
Pattern altitude & when to descend
The pattern is flown at a specific height called the traffic pattern altitude (TPA), given in feet above ground level (AGL). For light single-engine airplanes the TPA is most commonly 1,000 ft AGL. It is not universal, though: some fields publish anything from about 800 to 1,500 ft AGL, and large and turbine aircraft typically fly a higher pattern around 1,500 ft AGL so their faster, wider pattern stays clear of the light traffic below. Always fly the value published for that airport in the Chart Supplement — don’t assume 1,000.
The rule of thumb that keeps the pattern orderly: fly the entire downwind at TPA, level, and don’t begin your descent until you are roughly abeam the touchdown point (or turning base). Descending early on the downwind — a very common student habit — drops you into the airspace of aircraft on a lower, closer pattern and ruins your spacing. Hold altitude, reduce power abeam the numbers, and let the descent flow through base and final.
Self-check The Chart Supplement lists TPA as 800 ft AGL and field elevation as 1,200 ft MSL. What altitude do you fly on the downwind?
Show answer
2,000 ft MSL. TPA is given AGL, so add it to field elevation: 1,200 + 800 = 2,000 ft MSL — and that is the number you set on your altimeter for the downwind, because your altimeter reads MSL.
The 45° midfield entry at a non-towered field
At a non-towered airport nobody assigns you a place in the flow — you have to insert yourself into it smoothly and predictably. The standard, FAA-recommended entry is to join the downwind leg at midfield, at a 45° angle, at pattern altitude. Flying that 45° intercept toward the middle of the downwind gives everyone already in the pattern the best chance to see you, and gives you a full look down the downwind to spot and follow traffic before you merge.
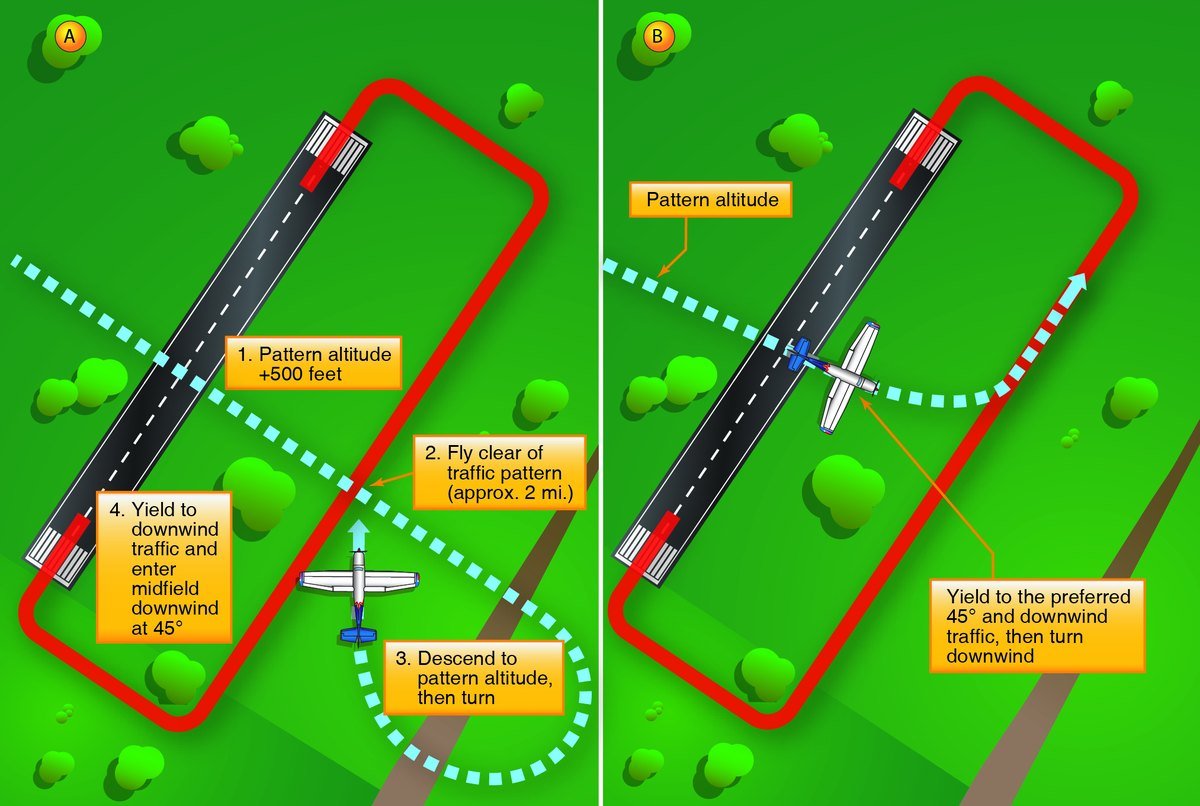
Departing is the mirror image. In a left-hand pattern you leave the pattern either straight out off the departure end, or with a 45° left turn beyond the departure end — and only after you have climbed beyond the departure end of the runway and above TPA. That keeps your departure path clear of aircraft still flying the rectangle. (For right traffic, the turn-out is a 45° turn to the right instead.)
Arrive set up Have the field’s CTAF frequency, the active runway (from AWOS/ASOS or other traffic), the TPA, and the pattern direction figured out before you get there. The 45° entry only works if you already know which side the downwind is on.
Self-announcing on CTAF
Without a tower, you provide the separation by talking. At a non-towered field everyone shares a Common Traffic Advisory Frequency (CTAF) and broadcasts their position and intentions so the picture stays clear in everyone’s head. The habit that makes these calls readable is simple: state the airport name first and last — first so listeners know which airport you mean (frequencies are shared between fields), and last to confirm it and cue the next caller.
Announce at each of these standard points:
- Initial / inbound — about 10 miles out, with your position and intentions.
- Entering the downwind — as you join the pattern.
- Turning base.
- Turning final.
- Clear of the runway — once you have taxied off, so others know the runway is free.
The template is airport — who you are — where you are — airport. For example, on the downwind:
Notice all the pieces: the airport name (“Half Moon Bay traffic”), your call sign (“Skyhawk 12345”), your position and intention (“left downwind runway 30”), and the airport name again to close. Every other call — base, final, clear of the runway — follows the same skeleton.
Towered fields: the tower sequences you
At a towered airport the roles flip. Instead of self-announcing to fellow pilots, you talk to a controller who is actively sequencing the traffic — deciding who lands and departs in what order and telling each aircraft what to do. Governed by 14 CFR 91.129 (and 91.123, which requires you to comply with ATC instructions), your job becomes: fly what the tower gives you, and read back the runway instructions.
You will hear instructions that actively shape your pattern to fit you into the flow:
When the tower says “number two, follow the Cessna on base,” you must find that Cessna, fall in behind it, and maintain your own spacing — the controller sequences, but you still see-and-avoid. “Extend downwind” means keep flying straight past your normal base turn until told to turn, to open a gap for other traffic. “Make short approach” asks you to turn base early and get down promptly. And any instruction that names a runway — a landing clearance, a hold-short, a taxi-into-position — must be read back, including the runway number, so the controller hears that you have it right.
Comply, then read back At a towered field you do what the tower says and read back anything with a runway number. Those two habits — compliance and read-back — are the core of operating in controlled airspace.
Picking the runway from the wind
Everything about the pattern points at one goal: land and take off into the wind. A headwind gives you the slowest groundspeed at touchdown, the shortest ground roll, and the most controllable airplane. So the active runway is chosen to be the one most closely aligned with the reported or observed wind. At a towered field the ATIS and tower tell you; at a non-towered field you read it off the windsock (it points the way the wind is blowing to), the AWOS/ASOS broadcast, or the traffic already established.
Runway numbers are just the runway’s magnetic heading with the last zero dropped — Runway 36 points 360°, Runway 9 points 090°. So to fly into a wind from 350°, you want the runway pointing most nearly north: Runway 36.
Then run the numbers Aligning with the wind is step one; the leftover crosswind and gust still have to be inside your limits and the runway long enough. Decode the wind in a METAR, then resolve the crosswind component and check ground roll before you commit to a short or gusty runway.
The go-around: a normal, planned maneuver
Not every approach should become a landing. If the runway isn’t made, the aircraft ahead hasn’t cleared, you’re too fast or too high, or the tower sends you around — you go around. This is a routine maneuver, not an emergency, and flying it decisively is a mark of a good pilot. The sequence, in order:
- Full power. Smoothly but promptly apply takeoff power to stop the descent and start climbing.
- Pitch for VY. Set a climb attitude and accelerate toward best-rate-of-climb speed.
- Positive rate, then clean up. Once the altimeter is rising, retract flaps in stages (and gear, if retractable) per your POH — never dump it all at once.
- Sidestep to the right of the runway. Offset slightly right so the runway (and any traffic on it) stays visible on your left, not hidden under the nose.
- Re-enter the upwind and rejoin the pattern for another try, or comply with the tower’s instructions.
Decide early, commit fully A go-around started early and flown positively is always safer than forcing a bad landing. Power first, then pitch, then clean up, then sidestep — in that order, every time.
Worked example: one full lap at a non-towered field
Let’s tie it together. You’re inbound to a non-towered field, Half Moon Bay. The AWOS gives wind 300° at 8, and the Chart Supplement shows left traffic, TPA 1,000 ft AGL. Here is the reasoning, leg by leg.
- Copy the weather & pick the runway. Wind 300° favors the runway pointing most nearly 300°: Runway 30. You’ll land toward the northwest, into the wind.
- Announce inbound (~10 mi). “Half Moon Bay traffic, Skyhawk 12345, 10 miles south, inbound for landing runway 30, Half Moon Bay.”
- Set up the entry. Left traffic means the downwind is on the left of Runway 30. Maneuver to join the downwind at midfield, 45°, at 1,000 ft AGL.
- Enter the downwind. “Half Moon Bay traffic, Skyhawk 12345, left downwind runway 30, Half Moon Bay.” Hold 1,000 ft AGL, level.
- Abeam the numbers. Reduce power and begin the descent — not before. Configure with flaps and slow to approach speed.
- Turn base. A 90° left descending turn. “…left base runway 30…” Keep the descent and speed stable.
- Turn final. Roll out aligned with the centerline. “…final runway 30…” On speed, into the wind, aimpoint fixed.
- Land — or go around. If anything is off, apply full power, pitch VY, clean up, sidestep right, and re-enter the upwind. Otherwise, land, taxi clear, and call “clear of runway 30.”
Notice the rhythm Every leg had a job: downwind at TPA to plan, abeam the numbers to start down, base to configure, final to stabilize. The wind chose the runway; the pattern direction chose the side; your radio kept everyone in the picture.
Common mistakes & misconceptions
These are the pattern errors that trip up nearly every student pilot. Knowing them in advance is how you avoid them.
Mistake Flying the wrong pattern direction. Turning right where the field uses left traffic (or vice-versa) points you head-on at everyone else. Check the Chart Supplement and the segmented circle for RP before you arrive — left is only the default, not a guarantee.
Mistake Flying the wrong pattern altitude. Assuming 1,000 ft everywhere. TPA varies (roughly 800–1,500 ft AGL, higher for large aircraft). Fly the published value, and remember it’s AGL — add field elevation to set it on the altimeter.
Mistake Cutting off traffic already established. An aircraft already in the pattern has the right of way. Don’t dive in ahead of someone on the downwind or turning base — sequence behind them.
Mistake Forgetting to announce. At a non-towered field silence is dangerous. Make every standard call — inbound, downwind, base, final, clear — with the airport name first and last.
Mistake Descending below TPA too early on the downwind. Hold pattern altitude until abeam the touchdown point. Sinking early drops you into a lower aircraft’s path and wrecks your spacing and approach.
Mistake Treating a go-around as failure. It isn’t. An early, decisive go-around — power, pitch, clean up, sidestep right — is the safe outcome, not the embarrassing one.
Frequently asked questions
What are the five legs of the traffic pattern?
Upwind (also called the departure leg — the climb straight out over the departure end), crosswind (a 90° turn after the departure end), downwind (parallel to the runway in the opposite direction, flown at pattern altitude), base (a 90° descending turn), and final (aligned with the runway for landing). They are defined in AIM 4-3-2 and 4-3-3.
Why are traffic patterns flown with left turns?
Left turns keep the runway visible out the left window for the pilot in the left seat, which makes spacing and traffic easier to judge. It is also the regulatory default: 14 CFR 91.126 requires all turns to the left at a non-towered airport unless approved indicators show a right-hand pattern.
What is the standard traffic pattern altitude?
For light single-engine airplanes it is most commonly 1,000 ft AGL, but published values range from about 800 to 1,500 ft AGL, and large or turbine aircraft usually fly around 1,500 ft AGL. Always use the altitude published for that airport in the Chart Supplement, and remember TPA is above ground level.
How do I enter the pattern at a non-towered airport?
The standard, recommended entry is to join the downwind leg at midfield, at a 45° angle, arriving at pattern altitude. This makes you predictable and gives you a clear view down the downwind to sequence with existing traffic before merging.
What does RP mean on a sectional or in the Chart Supplement?
RP means “Right Pattern” — that runway uses right-hand traffic instead of the standard left. It is published next to the runway, usually to avoid terrain or noise-sensitive areas. On the airport itself, the segmented circle’s traffic-pattern indicators show the direction for each runway.
What is ATIS and how often does it change?
ATIS (Automatic Terminal Information Service) is a continuous recorded broadcast of current airport weather and operational information at a towered field. It is updated roughly hourly, or immediately when conditions change significantly, and each update is tagged with the next phonetic letter (Alpha, Bravo, Charlie…) so you can confirm you have the current information.
In what order is ATIS information given?
Always the same order: airport and identification letter, time, wind, visibility, weather, sky condition, temperature and dewpoint, altimeter, the active runway(s), any remarks, and the instruction to advise you have that information. Much of it is simply the current METAR read aloud.
Which way do I announce on CTAF at a non-towered field?
Broadcast at initial (about 10 miles out), entering the downwind, turning base, turning final, and once clear of the runway. State the airport name first and last, for example: “Half Moon Bay traffic, Skyhawk 12345, left downwind runway 30, Half Moon Bay.”
What does the tower mean by “extend your downwind” or “make short approach”?
“Extend downwind” means keep flying straight past your normal base turn to open spacing for other traffic, until the tower calls your base. “Make short approach” means turn base early and get down promptly. Both are sequencing instructions; comply, and read back anything that includes a runway number.
How do I choose which runway to use?
Land and take off into the wind. Pick the runway whose number (its magnetic heading with the last zero dropped) most closely aligns with the reported or observed wind — from the ATIS/AWOS/ASOS, a windsock, or established traffic. A wind from 350° favors Runway 36.
How do I fly a go-around?
Apply full power, pitch for VY (best rate of climb), and once you have a positive rate retract flaps in stages per your POH. Sidestep to the right of the runway so it stays visible on your left, then re-enter the upwind to try again. It is a normal, planned maneuver — decide early and commit fully.
Is the wind ATC gives me true or magnetic?
Magnetic. The wind read to you on the ATIS or by the tower is referenced to magnetic north so it matches your runway numbers. The wind in the raw METAR text is degrees true — same wind, different reference.
Keep going: nail the radio work in Aviation Radio & ATC, decode the weather behind the ATIS in the METAR decoder, lock the calls in with flashcards, and browse every lesson back in the Classroom.